Overview of OfficeTools by CARET Firm Portal
OfficeTools by CARET Firm Portal provides a safe and secure way for people outside of OfficeTools by CARET to be able to see OfficeTools by CARET information.
With the firm portal:
- Documents can be uploaded and downloaded.
- Invoices can be uploaded by the firm and viewed by clients.
- Clients can pay their invoices through the portal using Abacus Payment Exchange (APX).
The Firm Portal makes sharing information easier, saving you and your clients time and energy.
Use this guide to help you customize your firm portal for your organization.
Read this guide to see the features for Portal Users.
Enabling the Firm Portal
- Select Setup > My Company > Information & Settings. Click Integrations.
- Ensure that the Portal tab is selected to see the Portal Integration Options Click Activate Firm Portal/Learn More.
- The Firm Portal Setup Form window appears. Read through the prompt and click on the link. Then click Edit Link and enter the subdomain name. This will be the URL that your clients use to access your firm portal. So, you might want to enter some form of your firm name, for example, acmeaccounting.
- Click Verify Link. A message indicates if the subdomain is verified.
- Click Activate Portal.
- The Firm Portal Terms and Conditions window appears. Click the link to read the license agreement. Then, check to agree to the terms and conditions and click Yes.
- The Portal Integration Options window changes to indicate that your firm portal is enabled. (This new layout replaces the old Portal Integration Options window layout.)
Changing Portal Settings
Once your firm portal is enabled, open the Portal Settings page to brand the portal and to control which staff gets email notifications.
Follow these steps to open the page:
- Select Setup > My Company > Information & Settings. Click Integrations.
- Ensure that the Portal tab is selected to see the Portal Integration Options (Notice that it looks different now that the firm portal is enabled.) Click Firm Portal Settings and Configuration.
- The Portal Settings page opens in a web browser.
Firm Setup
Firm setup controls the following parts of your firm portal:
- On the Portal Settings page, click Firm Setup.
- Under FIRM LOGO, click Browse and select the logo image file you want to appear on your firm portal. This logo also appears on any email notifications sent to contacts. The image file must be in JPG, PNG, or PDF format and must be less than 1 MB in file size with a recommended aspect ratio of 7:1.
- Under FIRM FAVICON, click Browse and select the image file you want to appear as the favicon for your form portal. The image file must be in ICO, PNG, or GIF format. The image dimension size must be no bigger than 32 x 32 pixels.
- Under FIRM CONTACT INFO, enter/edit the firm contact information.
- Click SAVE To save any changes.
Billing
APX must be enabled for clients to pay invoices through the portal. To enable APX, go to Setup > My Company > Information & Settings and select APX. Then, follow the on-screen directions.
Notifications
Notifications define the email addresses of staff that will receive notification when a client uploads a document to the firm portal.
Following is an example of a notification:
- On the Portal Settings page, click Notifications.
- Under DOCUMENT NOTIFICATIONS, enter the list of email addresses to receive notification when clients upload documents. Separate each address with a semicolon (;).
- Click SAVE.
Granting Firm Portal Access to a Single Contact
Once your firm portal is enabled, contacts must be activated individually to be able to use it. Follow these steps for each contact you want to be able to access and use the firm portal.
- From the Contacts tab, highlight the contact. Then, click the Portal button and click Manage Portal Access.
- The Manage Portal Access window appears. If an email address is entered for the selected contact, it is listed. If the contact has any linked contacts with email addresses, they are also listed. For more information in the table, check Show Expanded Access.
- To grant a contact access to the firm portal, check the Access To select all contacts listed, check Select All.
- Click Save. A notification window appears to indicate that the contact was linked successfully.
- The activated contacts will receive an email notifying them of the firm portal activation.
Granting Firm Portal Access for Multiple Contacts
- Select Contacts > Sync Multiple Contacts to Portal.
- The Manage Portal Access window appears listing any contact with an email address. To include linked contacts in the list, check Include Alt/Dep. To grant access to a contact, check their Access To grant access to all contacts listed, check Select All.
- Click Save to save your changes.
- The activated contacts will receive an email notifying them of the firm portal activation.
Denying Access to the Form Portal
- From the Contacts tab, highlight the contact. Then, click the Portal button and click Manage Portal Access.
- The Manage Portal Access window appears. Highlight the contact and click Delete Contact from Portal.
- Click Save to save your changes.
Onboarding Clients for the Firm Portal
Onboarding clients for your firm portal is an automated process and doesn’t require any extra action from the firm. Once a contact has been granted access to your firm portal, the contact receives an automated email with all the information needed to get started.
Sharing Categories to the Firm Portal
Categories are a way of defining your documents. If you want to assign portal documents to categories, those categories must be shared to the firm portal.
- Select Setup > Documents > Categories.
- The Document Categories window appears. Click Portal.
- The Shared Categories window appears. Highlight the categories that you want to share in the Available box and click Add. To unshare a category, highlight it in the Chosen box and click Remove.
- Click Close to save your changes. The saved categories are now available in the portal and can be assigned to documents.
Uploading Documents to the Firm Portal
Uploading documents make them available for the client to download from the firm portal.
- In the contact’s Documents tab, highlight the documents you want to upload.
TIP: To list documents for all contacts check View All Contacts. - Click Portal > Upload Selected Files.
- As the document is uploaded, an hourglass symbol appears in the Portal Once the document is uploaded, a green checkmark appears in the Portal column.
- The client receives an email notification that the document was uploaded.
- The client can now log into the firm portal and access any uploaded documents.
Downloading Documents from the Firm Portal
Documents uploaded to the firm portal are automatically downloaded to the contact’s Documents tab every 10 minutes. If you need to download a document manually, follow these steps.
Method 1: From the Documents Tab
- From the contact’s Documents tab, click Portal > Manage Documents.
- The Portal Documents window opens for the selected contact. Highlight the document you want to download and click Download. Downloaded documents appear in the contact’s Documents tab.
Method 2: From the All Portal Documents Window
- Select Contacts > Manage All Files on Portal.
- The All Portal Documents window appears. Check the documents to download and click Download. Downloaded documents appear in the contact’s Documents tab.
Removing Documents from the Firm Portal
Method 1: From the Documents Tab
- From the contact’s Documents tab, click Portal > Manage Documents.
- The Portal Documents window opens for the selected contact. Highlight the document you want to remove and click Remove Document.
Method 2: From the All Portal Documents Window
- Select Contacts > Manage All Files on Portal.
- The All Portal Documents window appears. Check the documents to remove and click Remove Document.
Uploading Invoices to the Portal
Invoices from the OfficeTools by CARET Workspace can be shared with clients so they can review and then pay them through Abacus Payment Exchange (APX). Since not all invoices are ready to be shared, the firm must upload invoices manually.
IMPORTANT: Only invoices in Final status can be uploaded to the portal.
Invoices are converted to PDF format before uploading to ensure that the client can easily open and access them.
There are 2 ways to upload invoices to the portal: When adding the invoice or from the Billing > Invoices tab after the invoice is added.
Enabling APX Payments through the Portal
Invoices on the portal can only be paid through APX, so not only does APX need to be enabled for the firm, also APX needs to be manually enabled for the portal. Once enabled, portal users will see the Make a Payment button for their invoices.
Follow these steps to enable payments:
- Select Setup > My Company > Information & Settings.
- Click APX.
- On the APX Settings window, turn on Enable APX on the portal.
- Click Yes to enable APX on the portal.
- Select the APX account to use to accept payments on the portal and click Accept.
- Click OK to save the changes.
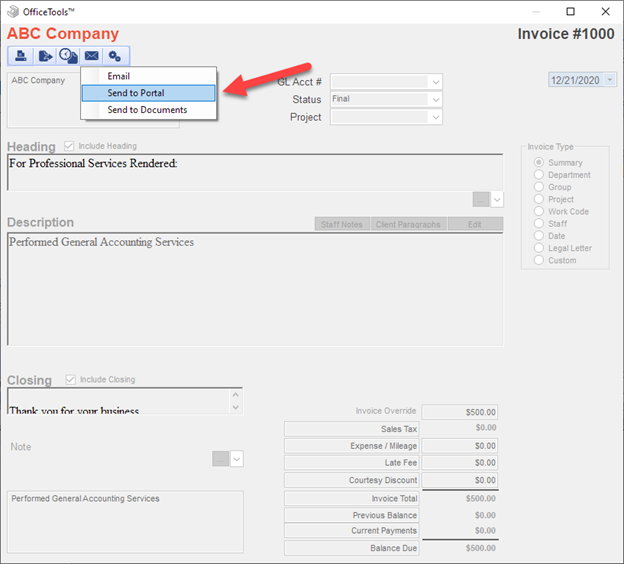
Uploading Invoices when Adding
After you have completed the information for the invoice, click the Send Invoice button () and click Send to Portal.
 Uploading Invoices from the Billing > Invoices Tab
After adding the invoice, find it on the Billing > Invoices tab. Then, do one of the following:
- Highlight the invoice and click Portal > Upload Selected Invoice.
- Right-click the invoice and click Upload Selected Invoice to Portal.
Email notification is automatically sent to contacts to alert them of the uploaded invoice.
Recognizing Uploaded Invoices
To determine if an invoice is uploaded to the portal, find it on the Billing > Invoices tab. A green check mark indicates that the invoice is currently on the portal.
Removing Invoices from the Portal
Find the invoice on the Billing > Invoices tab. Then, do one of the following:
- Highlight the invoice and click Portal > Remove Selected Invoice.
- Right-click the invoice and click Remove Selected Invoice from Portal.
Comments
0 comments
Article is closed for comments.